对threejs有了初步的了解后,就应该着手写出一个hello word来了。因为是学习threejs,所以我想先写一个 hello threejs。
在了解threejs的基本概念中,我们了解到threejs应用的组成结构,renderer渲染出具体的场景,通过Scene将内容展现出来、Scene中的基本元素是Mesh、Mesh由Geometry和Material组成、通过Mesh可以可以创造出各种不同的元素来,通过Camera来控制可见区域。
作为使用threejs做的第一个应用,我们将使用最基本的元素来完成hello threejs:一个Scene,一个Mesh,一个Camera。也就是接下来我们会创建一个立方体。
废话不多说,正式开始three.js之旅吧。
一、创建一个文件夹
创建一个文件夹,叫learnThree,然后再文件夹下建一个叫helloThree.html的文件,把基础的html架构搭建出来。
1 | <!DOCTYPE html> |
二、引入three.js
接下来在bootcdn上找到three.js的链接引入,可以点击three.js CDN链接根据自己的需要引入。这里我选择直接在标签中引入,代码如下:
1 | <script src="https://cdn.bootcdn.net/ajax/libs/three.js/r99/three.min.js"></script> |
引入three.js后的完整代码如下:1
2
3
4
5
6
7
8
9
10
11
12<!DOCTYPE html>
<html>
<head>
<title>hello three</title>
<meta charset="utf8" />
<meta name="viewport" content="width=device-width, initial-scale=1, minimum-scale=1, maximum-scale=1, user-scalable=no">
<script src="https://cdn.bootcdn.net/ajax/libs/three.js/r99/three.min.js"></script>
</head>
<body>
</body>
</html>
因为three.min.js有500多kb大小,为了保证速度,我将它下载下来,先在learnThree下新建一个叫js的文件夹,然后将three.min.js下载放到文件夹中,再引入helloThree.html,完整代码如下:1
2
3
4
5
6
7
8
9
10
11
12<!DOCTYPE html>
<html>
<head>
<title>hello three</title>
<meta charset="utf8" />
<meta name="viewport" content="width=device-width, initial-scale=1, minimum-scale=1, maximum-scale=1, user-scalable=no">
<script src="https://cdn.bootcdn.net/ajax/libs/three.js/r99/three.min.js"></script>
</head>
<body>
</body>
</html>
三、创建容器
接下来,在body标签中间加一个canvas标签,作为应用的容器,并将id设置为three,如下:1
2
3
4
5
6
7
8
9
10
11
12<!DOCTYPE html>
<html>
<head>
<title>hello three</title>
<meta charset="utf8" />
<meta name="viewport" content="width=device-width, initial-scale=1, minimum-scale=1, maximum-scale=1, user-scalable=no">
<script src="https://cdn.bootcdn.net/ajax/libs/three.js/r99/three.min.js"></script>
</head>
<body>
<canvas id="three"></canvas>
</body>
</html>
对canvas有了解的应该知道,平时我们使用canvas时需要给getConteext函数时传入的参数’2D’,我们才能正常绘制canvas图形。如果需要绘制3D图形,就需要传入‘webgl’了,代码如下:1
2
3const canvas = document.querySelector("#glcanvas");
const gl = canvas.getContext("webgl");
// 此处省略多个字
因为three.js是基于webgl封装的,因此它的任务也需要在canvas上来完成。
接下来创建一个在canvas下创建一个script标签,如下:1
2
3
4
5
6
7
8
9
10
11
12
13
14
15<!DOCTYPE html>
<html>
<head>
<title>hello three</title>
<meta charset="utf8" />
<meta name="viewport" content="width=device-width, initial-scale=1, minimum-scale=1, maximum-scale=1, user-scalable=no">
<script src="https://cdn.bootcdn.net/ajax/libs/three.js/r99/three.min.js"></script>
</head>
<body>
<canvas id="three"></canvas>
<script>
</script>
</body>
</html>
四、创建renderer
注意,重头戏马上要开始了,首先获取canvas
1 | const canvas = document.querySelector('#three') |
利用拿到手的canvas,我们创建一个WebGl渲染器,也就是我们之前一直说的renderer,具体方法如下1
const renderer = new THREE.WebGLRenderer({canvas});
完整代码如下:
1 | <!DOCTYPE html> |
按照three.js的应用结构图,我们已经有了renderer,加下来我们先创建一个Camera,然后再创建Scene和Mesh。
五、创建Camera
在three.js中,相机的类型比较多,这里咱们创建的是一个透视相机,透视相机是在three.js中用到比较多的相机,它用来模仿真实人眼看到东西的景象。
创建相机的方法如下:
1
2
3
4
5const fov = 75;
const aspect = 2; // 默认值
const near = 0.1;
const far = 5;
const camera = new THREE.PerspectiveCamera(fov, aspect, near, far);
完整代码如下:
1
2
3
4
5
6
7
8
9
10
11
12
13
14
15
16
17
18
19
20
21<!DOCTYPE html>
<html>
<head>
<title>hello three</title>
<meta charset="utf8" />
<meta name="viewport" content="width=device-width, initial-scale=1, minimum-scale=1, maximum-scale=1, user-scalable=no">
<script src="https://cdn.bootcdn.net/ajax/libs/three.js/r99/three.min.js"></script>
</head>
<body>
<canvas id="three"></canvas>
<script>
const canvas = document.querySelector('#three')
const renderer = new THREE.WebGLRenderer({canvas});
const fov = 75;
const aspect = 2; // 默认值
const near = 0.1;
const far = 5;
const camera = new THREE.PerspectiveCamera(fov, aspect, near, far);
</script>
</body>
</html>
这样,一个透视相机就创建出来了,在继续创建Scene之前,我们先了解一下传入到PerspectiveCamera函数中的4个参数值。
fov是指相机能够看到的视野范围。上面案例中的75就是指视野范围是75度。人不能直接看到自己的头和嘴巴,就是由于视野范围的限制。因此关于视野范围,可以这样想:人站在在一个完全平整的地面上闭上一只眼往前看,在最先看到的地面处画一个点,然后把睁着的眼睛当做一个点和地面上的点链接起来,然后以眼睛为起点画一条水平的线,我们就得到了一半的视野。如下图:
将已经得到的一半视野翻转180度后,就能得到完整的视野范围了。aspect指的是所能看到的画面的长宽比,默认是2.我们定义的fov字段,只是垂直视野,水平视野将根据它算出来,在案例中我们传入垂直视野是2,那么根据长宽比,可以知道,相机的水平视野是150。near和far代表摄像机距离画面的最近距离和最远距离,超出了这个距离范围,的画面,我们将看不到。
这四个参数在一起,定义了一个没有顶的金字塔形的盒子far减去near是盒子的垂直高度,在three.js应用中,只有画面在这个盒子中我们才能看到。如下图:
六、了解坐标系
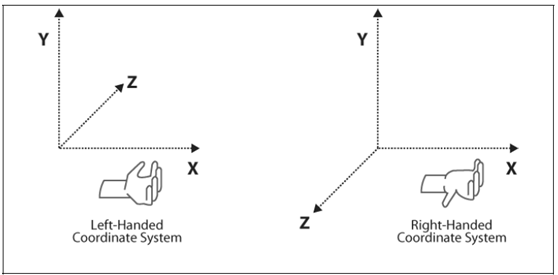
默认的情况下,以相机所在的位置为原点,会有一个三维坐标轴,相机水平方向正前方为Z轴负轴,也就是相机正对着Z轴负轴,背对Z轴正轴;相机向右则是X轴正轴,向左是X轴负轴;向上是Y轴正轴,向下是Y轴负轴。
后面创建的图形等,如果不做不做调整,则中心位置也在原点上。
关于坐标系,参考下图进行理解。

七、创建场景(scene)
现在,我们已经有了相机Camera,根据three.js应用结构图,接下来我们创建一个Scene。
代码如下:1
2const scene = new Three.Scene()
有了scene,我们再创建一个立方体放进去就可以了,回忆在了解threejs的基本概念中我们说过,一个物体就是设计图+原材料(可能有壁纸)组成,现在我们就按照这个思路创建一个立方体吧。
制造供制作立方体的原材料
1
2
const material = new THREE.MeshBasicMaterial({color: 0x44aa88});
- 创建设计图
threejs内置了很多基础的设计图,今天咱们就用立方几何体BoxGeometry来创建基础的设计图,只需要传入基本的长宽高参数,就可以了。1
2
3
4const boxWidth = 1;
const boxHeight = 1;
const boxDepth = 1;
const geometry = new THREE.BoxGeometry(boxWidth, boxHeight, boxDepth); - 将设计图和原材了结合起来,我们就得到了一个立方体,顺便我们调整一下立方体的位置。
1
2
const cube = new THREE.Mesh(geometry, material);
cube.position.z = -2
- 最后,将立方体放到
Scene中,我们就创建了一个完整的场景
1 | const scene = new THREE.Scene(); |
完整代码如下:1
2
3
4
5
6
7
8
9
10
11
12
13
14
15
16
17
18
19
20
21
22
23
24
25
26
27
28
29
30
31
32
33<!DOCTYPE html>
<html>
<head>
<title>hello three</title>
<meta charset="utf8" />
<meta name="viewport" content="width=device-width, initial-scale=1, minimum-scale=1, maximum-scale=1, user-scalable=no">
<script src="https://cdn.bootcdn.net/ajax/libs/three.js/r99/three.min.js"></script>
</head>
<body>
<canvas id="three"></canvas>
<script>
const canvas = document.querySelector('#three')
const renderer = new THREE.WebGLRenderer({canvas});
const fov = 75;
const aspect = 2; // 默认值
const near = 0.1;
const far = 5;
const camera = new THREE.PerspectiveCamera(fov, aspect, near, far);
const material = new THREE.MeshBasicMaterial({color: 0x44aa88});
const boxWidth = 1;
const boxHeight = 1;
const boxDepth = 1;
const geometry = new THREE.BoxGeometry(boxWidth, boxHeight, boxDepth);
const cube = new THREE.Mesh(geometry, material);
cube.position.z = -2
const scene = new THREE.Scene();
scene.add(cube);
</script>
</body>
</html>
八、让立方体显示出来
根据three.js应用结构图,我们已经有了renderer、Scene、Camera及它们需要的基本子元素,但是运行代码,会发现页面上只有一个黑乎乎的方块,这是因为目前为止我们还没有将Scene、Camera放到renderer中去,接下来把他们放进去吧。
1 | renderer.render(scene, camera) |
现在,刷新代码,一个绿色的立方体就出来六。
完整代码如下:1
2
3
4
5
6
7
8
9
10
11
12
13
14
15
16
17
18
19
20
21
22
23
24
25
26
27
28
29
30
31
32
33
34<!DOCTYPE html>
<html>
<head>
<title>hello three</title>
<meta charset="utf8" />
<meta name="viewport" content="width=device-width, initial-scale=1, minimum-scale=1, maximum-scale=1, user-scalable=no">
<script src="https://cdn.bootcdn.net/ajax/libs/three.js/r99/three.min.js"></script>
</head>
<body>
<canvas id="three"></canvas>
<script>
const canvas = document.querySelector('#three')
const renderer = new THREE.WebGLRenderer({canvas});
const fov = 75;
const aspect = 2; // 默认值
const near = 0.1;
const far = 5;
const camera = new THREE.PerspectiveCamera(fov, aspect, near, far);
const material = new THREE.MeshBasicMaterial({color: 0x44aa88});
const boxWidth = 1;
const boxHeight = 1;
const boxDepth = 1;
const geometry = new THREE.BoxGeometry(boxWidth, boxHeight, boxDepth);
const cube = new THREE.Mesh(geometry, material);
cube.position.z = -2
const scene = new THREE.Scene();
scene.add(cube)
renderer.render(scene, camera)
</script>
</body>
</html>
九、优化
到了这里,咱们的代码还是一进来就运行,我们做一个简单的函数将他们封装进去,待页面加载完成后再执行。
1 | <!DOCTYPE html> |
十、添加动画
虽然我们已经看到了东西,但是不出意外的话,只能看到一个绿色的正方形,并没有什么立方体,为了能看到立方体,我们加入动画,让它动起来。
这里我们使用requestAnimationFrame来完成,代码如下:
1 | function render (time) { |
完整代码如下:1
2
3
4
5
6
7
8
9
10
11
12
13
14
15
16
17
18
19
20
21
22
23
24
25
26
27
28
29
30
31
32
33
34
35
36
37
38
39
40
41
42
43
44
45<!DOCTYPE html>
<html>
<head>
<title>hello three</title>
<meta charset="utf8" />
<meta name="viewport" content="width=device-width, initial-scale=1, minimum-scale=1, maximum-scale=1, user-scalable=no">
<script src="https://cdn.bootcdn.net/ajax/libs/three.js/r99/three.min.js"></script>
</head>
<body>
<canvas id="three"></canvas>
<script>
function main () {
const canvas = document.querySelector('#three')
const renderer = new THREE.WebGLRenderer({canvas});
const fov = 75;
const aspect = 2; // 默认值
const near = 0.1;
const far = 5;
const camera = new THREE.PerspectiveCamera(fov, aspect, near, far);
const material = new THREE.MeshBasicMaterial({color: 0x44aa88});
const boxWidth = 1;
const boxHeight = 1;
const boxDepth = 1;
const geometry = new THREE.BoxGeometry(boxWidth, boxHeight, boxDepth);
const cube = new THREE.Mesh(geometry, material);
cube.position.z = -2
const scene = new THREE.Scene();
scene.add(cube)
renderer.render(scene, camera)
function render (time) {
    time *= 0.001
    cube.rotation.x = time
    cube.rotation.y = time
    renderer.render(scene, camera)
    requestAnimationFrame(render)
}
requestAnimationFrame(render)
}
window.onload = main
</script>
</body>
</html>
至此我们就能看到一个完整的立方体在不停的旋转了。可以复制代码到编辑器查看效果,也可以打开示例页面查看
最终效果如下: